Saturday, March 6, 2010

Using the diapers

Cloth diapering is easier than I had originally thought.

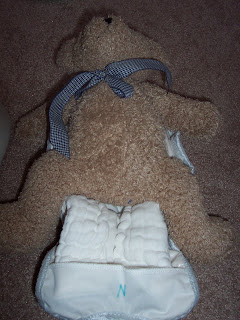
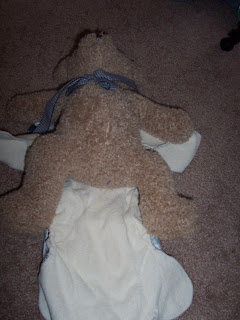
For the poo-pockets, I wrap the diaper around the baby (or teddy bear for pictures as my baby doesn't hold still), and then wrap the cover on top. Very easy and quick.


Step 1: Lay out the diaper cover and place the diaper on the cover. Lay the baby on top of the diaper.


Step 2: Wrap the poo pocket around the baby.


Step 3: Wrap the cover over the diaper and around the baby and over the diaper.


For the pre-fold diapers lay the diaper in the cover and put it on like a disposable by wrapping it around the baby and then securing it with the aplix (velcro-like) fasteners.



I put used diapers in an orange bucket that I got at Home Depot. This is called the dry pail method. While a baby is only breastfed, the diapers do not even need to be rinsed first.
Once my baby started solids, I needed to start rinsing his bowel movements out of the diapers. This is very easy with a toilet sprayer and potty pail. The sprayer attaches to the toilet. The pail has a hole in the bottom and sits on top. I spray the diaper in the pail and it goes right into the toilet to flush away. It really is quick and easy.


Then, I wash diapers every other day. I just put the diapers from the orange bucket into the washing machine. I run a normal cycle in hot water with Allen's detergent (you will want to buy special detergent that won't build up and reduce absorbency in your diapers), I also add in a pre-wash and an extra rinse.

For drying the diapers, I do the shortest cycle on the dryer and use dryer balls (fabric softener is not recommended as it can reduce diaper absorbency). Then I hang the diapers on a drying rack to finish drying. You can dry them completely in the dryer. I prefer the short cycle (to soften the diapers) and then air dry on the racks.
Thursday, March 4, 2010

Cloth diapering: The covers

Once I had my diapers, I needed covers to make them waterproof.

I used the New Conceptions pattern for the quick wrap. I used an inner layer of PUL fabric and an outer layer of a knit print fabric that I had in my fabric stash. I finished the edges with Fold over elastic.

These covers work well with prefold diapers, but my poopockets did not fit inside the smaller-sized covers.

For my poopockets, I use the Very Baby Sung Wrap cover.

You can purchase similar pre-made covers online.

***Key to cloth diapering****
Either your cover or your diaper needs to have gussets. The gussets stop the poopies from leaking out of the diaper onto clothes.

Cloth diapering: The beginning

I knew I wanted to cloth diaper long before I was even pregnant. I researched and prepared.

I started with the Chloe Toes diaper pattern and made the newborn size pocket diapers. The diapers I made leaked as there was not a snug fit from the leg elastic. Pee and poo just came out the leg openings.

Next, I tried the poo pocket pattern. The diapers were easy and quick to sew. I made these out of bamboo velour and hemp jersey or hemp fleece. This set turned out great as is highly absorbent. These were too big for my newborn, so I needed the smaller size. I made the smaller size out of cotton flannel. I did not like these as well as they were not as absorbent and leaked. I ended up having to double these with a prefold diaper to increase the absorbency for my newborn. The bamboo/hemp versions are highly absorbent and I do not have leaking problems.

I also bought a set of prefold diapers. I wanted to have these on hand.

I regularly use the prefolds and my bamboo/hemp poo pockets.

Tuesday, March 2, 2010

Fabric Books

My 11 month old loves looking through "Your Baby Can Read" Lift a Flap Books. The books aren't cheap, so we don't let him play with them (only adult supervised reading). He likes them so much, I wanted to make him some books that he can read on his own (no adult supervision required to protect the books). So, I made a fabric version using iron on transfer and words and pictures printed from my computer.

Here's how I did it.
1)Created a word document with the words I wanted to use and printed it on the iron on transfer sheet.
2) Printed pictures (some from the Picture This CD) and some from my own picture files.
3) Cut 8.5"x11" rectangles out of white muslin. Ironed on the photos. Cut out the same size rectangle from scrap fabric for the backing and of thin batting. Sewed the 3 layers together and then turned them right-side out. Then top-stitched 1/4" around the page. I also stitched 1" along the edge that will be bound.
4) Next I cut more 8.5"x11" rectangles out of white muslin. I folded the rectangles in half, and then ironed on the words. I refolded the rectangles with the words on the inside and stitched 1/4" on each side. Then I turned the flap to the outside and pressed the edges.

5) Next, I pinned the flap on the book page and sewed 1/4" (See picture below).


6) Then I turned the flap down and stitched a 1/4" again (see picture below).


7) Then I marked where I wanted the binding. I made a small button holes for the binding rings to go through. I got these rings at Walmart.


-You may wonder why I bothered to make the word flaps instead of putting the word under the picture. First, the Flip-a-flap books are set up this way. Second, there is empirical research that suggests that presenting a picture with the word may block learning to read the word for individuals with developmental disabilities (Fossett & Mirenda, 2006).

Fossett, B., & Mirenda, P. (2006). Sight word reading in children with developmental disabilities: A comparison of paired associate and picture-to-text matching instruction. Research in Developmental Disabilities, 27, 411-429.