Sunday, October 9, 2011

Dot-to-dot and matching quiet book page

The dot-to-dot is another copy of Creating Sarah's quiet book ideas. It uses magnets sewn into the fabric. My magnets are larger than the ones Sarah used and work for my 2-year old. I plan on making a couple more dot-to-dots when I have time.

The page on the left is my idea. I just took some scrap fleece (most of the colors are just strips from some rainbow fleece I had) and cut out rectangles. The "towels" are attached with velcro.

Fix my hair Quiet book page


I honestly can't remember where I saw this idea, but I will update to give credit when I find it in my notes.
This page is musin backed in denim. The left side has 3 ribbons sewn into the page at the top and bottom and then down the middle. The hair bows were from my stash that my sister gave to me (she made them) when my niece outgrew them. I used fabric markers to draw on the face. The hair is made of yarn. I cut long lengths of yarn (I didn't measure how long) to go from the bottom of the page around the head shape to the bottom of the other side of the page. I then sewed them down at the top of the head. Next I sewed the yarn hair down at each side of the top of the head to keep the hair off of her eyes. I trimmed her hair last to make it even on the bottom.

My kids love this page and spend a lot of time putting all of the hair bows in her hair.

Marble Maze quiet book page

I have been following Sarah's quiet book ideas from Creating Sarah and gradually making my own based off her her ideas. This is my knock off of her marble maze. I used muslin for the inside and denim for the backing. The drawing and writing are done in fabric markers that I bought at Walmart. You can ignore the blue pencil lines (I drew in 2" lines to base my maze on with washable fabric pencil -I just haven't washed it out yet). The 2" mazes are a little large for the marbles, but work for my 2-year old.

Wednesday, August 10, 2011

Magic blanket binding/Baby blankets

I came across a tutorial on the blog Family, Fabric, and Fun for magic blanket binding. With this method, the front piece is cut smaller than the back, and the extra part of the back fabric becomes the binding.

The monkey blanket below is my second attempt at this method. I used fleece for the backing and then sewed down a strips of satin material as a border on the fleece. Then I followed the tutorial for sewing the blanket together. My corners didn't come out completely flat as the satin and fleece didn't stretch quite the same way (I tried to treat them as one piece of fabric), but I think it turned out cute.

The flannel blanket below was my first attempt. It turned out really well. After washing it again, the back and front don't completely stay in place, so I want to sew across the middle of the blanket a few times to keep everything in place.
The matching burp cloth is a from a free pattern and tutorial by Homemade by Jill. I use this all of the time. I am not in love with the ragged edge look, so when I make more, I plan on enclosing the raw edges.

Diaper Bag


I made a diaper bag following the directions/tutorial on Sew Much Ado. I used denim for the outer fabric and a thrifted satin sheet for the lining. I did line the inner pockets with a cotton fabric from another project instead of using bias tape to finish the edges. I also added a front patch pocket. I also used velcro for closing flap instead of a magnetic snap (it is what I had on hand).

I have been using this bag for a few weeks now. I love the inner pockets which make it easier to find smaller objects I want to carry around (pacifiers, comb, brush, etc.). I have to be careful with my closing flap and the velcro as it will snag the satin lining.

Sunday, January 30, 2011

Adult sweater to toddler vest

This is based on another great MADE tutorial. This tutorial tells how to turn a large sweater into a toddler sweater vest. So, I cut out the sweater based on another shirt that fits my toddler. Then I finished the neck and arm edges with ribbing. I think it turned out well and it is honestly the best job I have ever done on finishing a v-neck without a pattern.

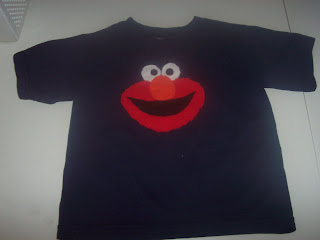
Elmo shirt

My toddler loves Elmo. He has an Elmo pajama shirt that he insists on wearing to bed every night. He would probably wear it during the day too if I let him. So, I followed the tutorial on MADE for making an Ernie shirt, but made an Elmo shirt instead. It was super easy to follow and turned out really cute. I downloaded a free Elmo color page from an internet search, and made the head portion larger to fit the shirt. Then I used t-shirt scraps to make Elmo.
I cut out the red head shape and made the edges jagged with my scissors to give Elmo more of a furry look.